Saturday, February 13, 2016

Side Projects Part 2: Knitting

Many moons ago (is that nights or months? I never figured that one out) I splurged and purchased the utterly rad steampunk/post-apocalyptic knitwear collection Doomsday Knits. I drooled over every page, and then finally settled on the Fennec shrug for my first project. I loaded up on Cotlin DK in Linen and Brown Sugar and got to work. I had to adjust my math on the fly to account for a slightly loose gauge and my own measurements, but knitting the main body, hood, and sleeve trim was a breeze. Even the seaming was straightforward and quick.

Then I got to the front trim/band thing. I hadn't realized at first that the band was only longer than the shrug on one side. Sometimes I can deal with asymmetry, but a long tie that I can't even TIE? What is this madness?! I knew it would drive me crazy, and the only sensible solution seemed to be making it long on both sides so that I could cross them, wrap them around my body, and tie them again the front. I somehow arrived at a length of 11 feet for this purpose, and cast on a whopping 594 stitches. It took me weeks just to knit this narrow band.

This is where a picture of that monstrosity being blocked would go, if I could find it!

Even after it had blocked, it was just so heavy that it would hang curled into a dense, heavy rope when draped over me. I held out (completely unrealistic) hope and started attaching it to the hood, but it was obviously no good. The weight of it was making it at least an extra foot longer, and it was just so heavy and unwieldy that I was unpleasantly reminded of trying to tie on a Moby wrap.

Frustrated, I shoved it in a box and ignored it for an entire year.

I probably would have gone on ignoring it, except that I spotted the box taking up room in my closet and couldn't honestly remember what was in it. I pulled it down and was suddenly convinced that I could fix it!

Step 1: Rip off and frog the entire 11 foot band. No hesitating. Just do it.

Step 2: Soak the rest of the shrug and throw it in the dryer on high heat to see if you can get it to shrink at all because even with all my mathing, it was still roomier than I'd like.

Step 3: Reknit the band to have NO TIES AT ALL. Only make it long enough to be decorative trim.

Step 4: Shrink and seam that sucker, and wear it with pride!

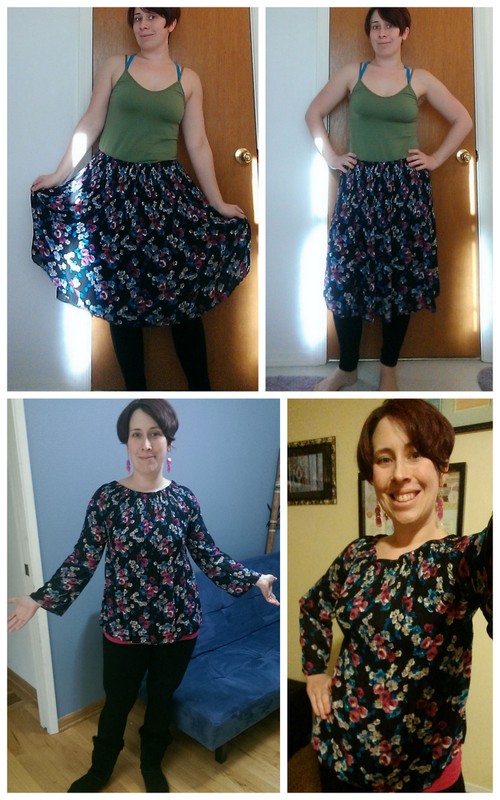
I'm happy to say that all steps were followed with success. I even wound up putting a small button right at the neckline to hold it closed. While it's still kind of a weird sweater that I won't wear super often, I'm glad I rescued it! And I got compliments!

Forgive my derpy expression. I was trying to look like a cool magazine model. I'm a terrible model. >_<
In fact, the first time I wore it was the to the first Shawl Ministry meeting I attended - Part Two of my knitting side project story! A much shorter part. I signed up for the UUCCWC Shawl Ministry, I showed up the first Saturday in February with yarn, tools, and brownies. Everyone was happy to see me, I had a lovely time, and I cast on for a purple lace shawl that will be added to the stash of scarves and shawls donated to those in need of comfort. Next month we're all going on the Rose City Yarn Crawl together! Wooooo yarn nerdery!

Side Projects Part 1: Sewing

I finished the first fifth of my Design Challenge surprisingly quickly - I still had the fox hat lying around that I had knit for the craft fair, and it didn't take long to whip up a pattern by studying my sample. Because it's a rectangular hat, it also was very simple to resize, and I created a slightly larger size version of the face and ear appliques to go with the larger adult size. I sold one just a few days after posting it on Ravelry and Craftsy!

Since it was still only the end of January and I already had one published pattern in the bag for 2016, I felt comfortable taking a break to work on a few sewing projects. I had been to the craft store in mid December with Chloe and she dug a small roll of rainbow tie-dyed fleece out of the remnants bin. It was only a couple dollars, so I grabbed it for her, and was able to make her some simple pants the same day. The pattern I printed out for them wound up being so large, I had to hem something like four inches up from the bottom, but she loves the super wide leg!

Pants!

Then, on my little hiatus, I discovered I had more than enough left over to make this super fun dino/dragon/monster hat for the birthday of a friend of hers, although unlike the pants, this one came out much smaller than I expected... I may have to remake it. But if I do that, I believe I can just pull the spikes out and re-cut only enough fleece for the body of a larger hat. and reuse those same spikes that are already cut and stuffed.

Rawr! Sleeping models are SO easy to work with!
I also stole a quick bit of time to refashion a gauzy skirt I'd received in a bag of free clothing. The skirt wasn't really my style, but I loved the fabric and I didn't want to just give it up. I came across a reader submitted post on ReFashionista that turned a maxi skirt into a cute peasant dress, and I was inspired! I cut out the horribly frayed lining, kept the waistline intact as a neckline, and just slit and seamed about 8" in from both sides to create sleeves and voila! The shoulders don't always sit perfectly neat but I don't think anyone who didn't know it started life as a skirt would be able to tell! I wore it to church the day after I made it. :D


Next up: I dig out and finish an ancient WIP and join the shawl ministry at my church to do some charity knitting!

Wednesday, January 13, 2016

Design Challenge 2016

I felt so good about reentering the pattern publishing game that I decided to challenge myself this year to keep designing, writing, and publishing! I wanted something that would stimulate my creativity, and keep me motivated, productive, and on schedule. I wanted to make sure it would be fun, and exciting, and not feel like a chore, and that by the end of the year I would feel like I've really grown as a designer and earned a lot of practical experience. Earning a little money wouldn't hurt, either.

I Googled for a while but couldn't find anything even remotely close to what I was imagining. All my results were either KALs (knitalongs) or design contests. So, I simply made one up on my own. Perhaps someday other people will use it!

I started with the Ravelry pattern browser filters for inspiration. There are five main categories of items: Accessories, Clothing, Home, Toys and Hobbies, and Pet. There's a sixth category, too, called Components, which is a sort of catch-all for appliques, blocks and squares, charts, tutorials, etc. I decided to ignore this one for now and focus on the first five.

I would like, by the end of the year, to have one pattern available for sale in each category. This means either coming up with a completely original design, or using something completely original that I've already knit in the past, and writing out a full pattern for it, complete with photos, editing and formatting it, and listing it on Craftsy and Ravelry. I haven't decided yet if I'll have all of them test knit first. The clothing one I probably will, because any good clothing pattern should be available in multiple sizes. But I may not have enough time to have them all tested.

so damn cute
I've already selected my item for Accessories - a crazy cute fox hat that I knit for the craft fair. It didn't sell that day, so I have it on hand to study closely, which is fortunate because I didn't write any of it down while I was improvising it! I also have no idea what brand yarn I used, so I'll have to do some retroactive yarn hunting to figure that out, or at least get close enough.


Here's a peek at my brainstorming for the other categories:

  • Clothing - probably a shrug or bolero. Keep it simple. A complicated pullover could take you all year just by itself! I'm thinking a square lace back knit in the round, with added sleeves and collar.
  • Home - Hmmm so many possibilities! Cafe curtains for the kitchen? Throw pillow? Nerdy coasters? I'm the least decided on this one of any category.
  • Toys and Hobbies - Could be a stuffed animal, but I'm leaning towards creating another dice bag! They're so fun! And I got inspired and went a bit nuts sketching out some steampunk fairisle ideas. 
  • Pet - A small dog sweater that looks like a turtle shell, with a long snood. I don't know where this idea came from but once it was in my brain it would NOT go away. I even made a sketch. I must make this a reality.
Oh! And part of the challenge is that I need to blog regularly about it, at least once a week, partly to keep me on-track and accountable but mostly because I need an excuse to write more often! See you soon!

Saturday, January 9, 2016

An Overdue Resolution

Almost exactly two years ago, a mom in my local parent group commissioned a custom knit hat from me. She sent me a handful of Googled pics of what she had in mind, but I wanted to design something original and hopefully, eventually, publish a pattern, so I used her pictures for inspiration rather than to inform a Ravelry search of existing patterns.

She wanted it to be chunky, cabled, and billed. I had fun coming up with something beautifully geometric, texturally rich, and of course, snug and cozy. The bill was an especially exciting challenge as I had never knit a billed hat before and I had to tackle some pretty unfamiliar techniques to get the shape and firmness just right.

Rocking the original commissioned hat in 2014

It took me all of three days to knit that hat and note down the details of what I'd done, and another day or so to flesh out a proper pattern. Shortly after I sold it to her, I realized I would need better procedural photos to include with the pattern, so I started knitting a second hat - the pictures my husband took while I was knitting that extra hat became my smocking tutorial post. I finished the main body of the hat in a day, and set it aside to do the bill and button band later.

Later never came.

By that time, I had found out I was pregnant with Cyrus, I was also working like crazy on getting the Silicon Forest pattern polished and published. More new projects called, my belly expanded, and the 90% finished hat pattern project just sat and sat and sat. And then, naturally, I had the baby, and for quite some time, anything I wanted to do in my precious spare time had to be excruciatingly prioritized.

I knit fewer than two dozen items in 2015 and most of them were for that craft fair at church.

So when 2016 took over, I didn't necessarily resolve to do anything. But I took a good look at what I had left unresolved for too long. And I decided to stop making excuses for the ones that I had no honest reason for ignoring. Like this hat. All in all it took me just over two hours to knit the bill, take the pictures I needed, proof the pattern, and fill out all the listing information to sell it on Ravelry and Craftsy.

Accomplished adult couch selfie!

And now I have TWO patterns for sale. Ha. I'm so legit.

PS: I didn't knit the button band. I didn't need a picture of that. I'll get to it... later...

Sunday, November 15, 2015

My First Craft Fair

After 3 months of knitting like crazy (or as crazy as you can when you can't put down the steampunk series you just discovered), I managed to produce a decent handful of stuffed toys. It wasn't nearly as many as I had hoped to fill my table space, but fortunately I had a plentiful stash of previously unsold items to display - a few tops, scarves, shawls, and hats to show off my range of ability and style.

I also spent several hours putting together a portfolio of my best work, since commissions have always been my best source of sales.

The sale was in the church basement directly after the service, so for the first hour, we had a built-in stream of customers in an exit-through-the-gift-shop kind of way. I made two sales and lined up a commission very quickly, and then a visit from friends garnered a third sale. And then, as the congregation made their way home, I eagerly awaited the dozens of people who would surely make the trip to our little tucked away corner of Hillsboro for such an event.

The hours crawled by. The kids of vendors popped in and out but rarely was the sound of the basement door opening accompanied by the appearance of an actual customer. By the time 3 o'clock rolled around, I hadn't made any more sales, and I had an awful lot more to pack up and take home than I had expected.

Despite the dismal turnout, I could hardly have asked for a better "practice fair." The cost of my table space was a percentage of my sales rather than a flat fee, so there was no risk of losing money. Most of the customers already knew me, so they weren't (visibly) annoyed by my embarrassing lack of business cards or shopping bags. There was a ready supply of coffee and snacks, for which I was especially grateful since I had entirely forgotten to bring a lunch. The woman who won my hat in the raffle was adorably gleeful and didn't take the it off for the rest of the time she was there.

 And a special shoutout to my husband, who was not only endlessly supportive and helpful while I was knitting and agonizing over inventory and pricing, but took care of the kids the whole time I was at my table, shuttling them home from church and back again to pick me up. And then sprang for beer and gyros. What a guy. ^_^

I had hoped to walk away with more cash and less yarn, but all in all, it was an exhausting, educational, and most certainly memorable experience.

Thursday, August 13, 2015

What Have I Gotten Myself Into?

Hoo boy.

I started attending a UU church back in May. Fabulous people. Completely welcoming. I love everything about it.

So, this past Sunday in the weekly newsletter I happened to see a notice about a craft fair in November. Craft fair! Those words make my heart sing and my brain flood with the smell of wool and fabric glue. Blithely refusing to think it through, I marched straight to the coordinator, Sandi, and asked her what it would cost to have a table.

Much to my delight, the table is free! With a requested donation of a craft item to the raffle and a suggested donation of a small portion of my earnings for the day. Absolutely! Sign me up!

Apparently they are really not lacking for knitters (imagine that), and especially not lacking for knitters who mostly knit hats (oh darn), but Sandi pounced when I stuttered out stuffed animals in the list of things I could potentially provide. There used to be a knitter of stuffed animals, I was told, until she moved back to Germany, leaving quite the sad, knitted-stuffed-animal shaped hole in the UU church craft fair offerings.

Blitheness unchecked, I cheerfully asserted that I could certainly knit a table's worth of stuffed animals in barely more than 90 days. While raising two tiny children. And finishing the gifts for my new niece and nephew. Absolutely. Piece of cake.

Hoo boy.

Wednesday, May 14, 2014

Sailor Dress - Ruffles and 'Rithmetic

I got about 6 rounds into the cable section before I realized I was just kidding myself. This dress was going to be WAY too small, even for my petite princess. Rather than rip all the way out and start over with a heck of a lot more cast on stitches, I decided to simply give up the box pleat dream and ruffle the skirt instead. Ruffling is pretty dang simple, technique wise, since all it means is really rapid decreasing. As in, decreasing over half your stitches in a single round. And heck, it'll mean less ironing and blocking, too.

I know I say all the time that knitting (especially designing or heavy modding) involves a lot of math. It's usually super basic level algebra, sometimes just plain arithmetic, but I enjoy doing it. It makes my brain feel stretchy. To give you an idea of what my knitting problem solving looks like, here's the Notepad window I used to keep track of my thought process and calculations. Sometimes I write it out on paper; sometimes I type. Either way, it helps me enormously to write out each plodding step, no matter how insignificant or easy to do in my head, so that when things don't come out right in the end, I know exactly where it went wrong. This is even more of a necessity with pregnant-brain.

The proper desktop wallpaper is a crucial part of the process.
So, here's the product of all that math! I've successfully worked the ruffling round, now have the correct stitch count for a 22" body circumference, and am putting in some narrow stripes before I start the cabled top section. I'm fairly happy with the degree of ruffletude - I think it'll drape nicely once the curl is blocked out of the stockinette!

Ruffletude... ruffleosity... rufflishness...?


Saturday, May 10, 2014

Sailor Dress - Pleats and Problems

I picked up two lovely, silky skeins of Think Bamboo midnight blue lace weight at Black Sheep a couple weeks ago and was inspired to make Chloe a sweet little sailor dress for this summer. I found a pattern I liked as a starting point over at Patons, but I wanted to make several changes for maximum class and cuteness -
  • shorter, diaper-skimming skirt section
  • inverted box pleats instead of knife pleats
  • different cable pattern for the body
  • sleeveless, with narrower shoulders
  • i-cord collar edging instead of the back-flap collar
  • matching i-cord edging around the armholes
I originally intended to leave narrow open spaces  (4 stitches wide) between my box pleats, and I did my stitch math accordingly. However, after working a few pleats that way, I decided I really didn't like the look, and switched to regular inverted box pleats. Stupidly, I completely failed to note that this would dramatically alter my final stitch count. I finished the pleating round and realized I was now working with a 16" waist instead of the 20.5" I was supposed to have. While I think I can get away with the waistband having this much negative ease, I really don't want it that tight through the chest.

Inverted box pleats - half done
So, rather than fiddle with too many increases and making it look baggy, I've chosen a light fingering weight white yarn I had in my stash already to do the cabled top portion of the dress. The gauge change will not be dramatic, but I'm hoping it will be enough to make the dress fit comfortably. If I have to rip this out entirely and start over, I may not finish it in time for her to wear on our trip to visit family this summer.   

Tuesday, April 22, 2014

Happy Ravelversary!


On this day six years ago, I joined Ravelry!  Ravelry is an incredible community of knitters and crocheters from around the globe. These days, when someone asks me to teach them how to knit, I start with the basics, yarn and needle selection, casting on, knit and purl. My next instruction is usually to create a Ravelry account. That's how helpful and essential it is.

Ravelry has grown in spectacular leaps from its inception - when I joined, their server capability was so limited that you had to get on a waiting list to even be allowed to create a user account. I'm not sure how long the site had already existed when I joined, but after at least the last six years, it now boasts:

  • the single most comprehensive pattern index you could hope to find, searchable by dozens of detailed filters 
  • similar indices for yarns, designers, and pattern sources 
  • the ability to host your own PDF patterns for sale and download 
  • an excellent project journaling system designed to track every detail of your works-in-progress and showcase photos of the same 
  • a library tracking system to keep track of the patterns and pattern books you own 
  • same for your needles, hooks, and yarn stash 
  • a vast hive of social groups, each with its own network of message boards 
  • a blog and newsletter 
  • a merch store 

Truly, this site is the online dream-house of every yarn addict I know. If you are new to the craft (or not), and have not yet discovered Ravelry, please let me strongly encourage you to join up. They are now over a million members strong - no more waiting lists!

Also, it has all the letters in my name. So, that ups the awesome. ^_^

Thursday, April 10, 2014

Top-Down Set-In Seamless Sleeves (WHAT?!?!)

Tasha, the stylish genius behind By Gum, By Golly, just may be my new favorite craft blogger. She did not invent this ingenious method for sleeve knitting, but her tutorial is beautifully written and illustrated, and discovering her blog was nothing short of a "Eureka!" moment in the process of designing the Flamingo Cardi.

With all the garter rib pieces finished and seamed together, I found myself faced with large, asymmetrical armholes, and absolutely zero experience shaping set-in sleeves from scratch. Not willing to just wing it on something as structured as a sleeve cap, I googled for days, looking for the right tutorial, the right shaping wizard tool, something designed for knitting, not sewing, although I knew I could manage to convert the basic concepts if really necessary. Nothing I found seemed exactly suitable, especially for the unusually shaped armholes now staring me down.

Somehow, somewhere in there, I stumbled across Tasha's tutorial. And it was like one of those beautiful moments of clarity you read about. The room seemed brighter, music played somewhere.

The basic gist of it is, without stepping on Tasha's toes - because really, you should go to her for this - you pick up stitches around the armhole, and then work short rows centered at the shoulder, increasing one stitch at a time on either side, until you get to a certain marked point near the bottom of your sleeve, and then just start working in the round. It's so simple. And so obvious after the fact, in the "why didn't I think of that, except of course I never would have" kind of way.

It did take a bit of finagling on my part, due to that crazy asymmetry of my sweater design. But I've got one sleeve finished now, and it hangs perfectly. I did the first sleeve entirely on dpns, but I have a few uneven stitches sprinkled through it, probably due to working with a looser gauge that I'm accustomed to. For the second sleeve, I picked up the stitches with dpns but then thought better of it and switched to my circular to shape the cap. I'm ready to work in the round now, and I may have to switch back to dpns soon, since I'll have to start decreasing down the sleeve and my stitches already barely fit on my single size 9 circular. I really should get a second one. Knitting in the round on two circulars is SO much better than dpns.


I also went lace hunting for the trim yesterday morning, and scored the perfect pale pink floral lace. It's a large-patterned lace like on the original sweater, and while it's not a flawless color match for the yarn, it's pretty dang close and I think it's going to look lovely! Better make sure I know where my ballpoint sewing needles are...


Friday, March 21, 2014

Flamingo in Progress

Update! I've been calling the cardigan project for mom The Flamingo Cardi, not just because of the yarn color, but because the sweater itself actually reminds me of a flamingo. The long lines, the graceful sweep of the upper back, and the broad, folded back "wings" that make up the sides and lower back - all it needs is some black leggings! :)

I finally finished the shawl collar late last night and set it to block this morning. I wound up using just barely over 3 skeins, and it will be about 53" long and 13" wide when it dries. On mom's petite figure (same as mine), it should hit just at hip level.

Blocking

I knit from both ends up, so that the slip stitch columns would go the same direction, and kitchenered them together at the center. Looking at the photo, the original sweater clearly just has a regular seam there, but I wanted something with a lower profile that would lay comfortably on the back of the neck, and not add bulk to an already considerably bunched collar. The graft isn't completely invisible, since I couldn't mimic the slipped stitches, but it is neat, smooth, and will be largely hidden when worn anyway.


 Of course, these were the easy sections. The sleeves only present a challenge in finding the right measurements for the sleeve cap. Once I work that out, actually knitting them will be quick since they are just stockinette. The real challenge is the side/lower back panels, what I've been calling the "wings." These pieces have extensive, asymmetrical shaping. Each wing needs to reach from the front shoulder, all the way down along the shawl collar and past it to hit at mid-thigh, and then wrap around the side, shaping the arm hole as it goes, to join with the bottom edge of the back panel along its curve.

The photos of the original sweater were a great place to start for some of the basic shaping needs, but there were two major problems - 1) Mom didn't move the sleeve, so several columns of stitches were completely obstructed, including the underarm shaping; and 2) it's a 3D shape, and as neatly as she had it spread out, I still can't see the shape of the flat knitted piece without actually ripping some seams out.

So, I turned to draping to help me work it out. Draping, in sewing and garment making, is the process of ruining a cheap piece of fabric by pinning it to a dressform where you need the final garment to hang, making sure to pin down where you need folds, darts, etc, marking the armholes and so forth, and then using that as a mock-up or pattern for cutting your nice fabric. It can also be useful in knit designing, because once you get all your outlines marked while the fabric is on the dressform, you can then take it off, lay it flat, and use the measurements to math out exactly what you need to do with your needles to make that odd shape.

I do not have much experience with draping. I am a lazy costume maker and I usually just dive right into my nice fabric. However, I recently acquired a very large lace dust ruffle at Goodwill, and the center of it (the part that usually gets hidden under your mattress) is a perfect source of throwaway material. Still, my first attempt at creating a draped mock-up for the wings was very Frankenstein:

I am terrible at draping. 
I completely misjudged the angle of the bottom hem with my initial piece and had to hack it up and pin the scraps all over each other to jigsaw it back into something that hung right. But! Once I had that monster held together just so, I was able to carefully remove it from the dressform, lay it down on a fresh section of my cheap fabric, and trace the outline to give me something whole and clean that I could extensively mark up with measurements, stitch and row counts, and shaping instructions. Et voila:


Sadly, based on the size of this panel and the fact that I have already consumed more than 40% of my yarn, I know now for sure that I do not have enough yarn to do the sleeves. I will contact Knit Picks to see if they even have any left in this dye lot, and then figure out what I'm going to do from there. 

Wednesday, March 19, 2014

Spring is Coming!

The sun is shining more often than not, the flowers are starting to peek out - 'tis the season for knit lace!


Chloe is wearing the Esme pullover knit from Patons Beehive Baby Fingering in the color Vintage Lace - I just love it when the color matches the project so well. :)


Friday, March 7, 2014

Copycat Designing

Such a good sport!
A couple weeks ago, mom sent me photos of a coworker in a long, swingy, open-front cardigan and hinted rather strongly that she'd love for me to knit her one just like it. The sweater in question was store-bought, and an exhaustive search of the Ravelry pattern database turned up nothing even remotely similar. This by itself was actually pretty surprising, since the Ravelry collection is massive, comprehensive, and very well indexed, and I've seen similar flowy cardigans all over the place for the last few years. I even own a couple. It seemed inevitable that someone, somewhere, had written a pattern for something that was close enough to be modded with little difficulty. But I found nothing.

It was hard to be disappointed, though, because that meant I got to design it myself! Woo!
One of the super helpful structural photos mom took.
Copycat designing has its obvious advantages.  Since it's not my own original brainchild, much of the designing work is already done for me. There's an existing, wearable example for me to work from. Ideally, I'd be able to get my hands on it, measure it, possibly even deconstruct it, but alas, this particular sweater lives on the far side of the continent. The hardest part then, as far as getting a good replica, will be studying the photos as closely as possible and using everything I know about knitting to figure out, just by looking, what the stitch pattern is and how and where all the shaping was applied. I'll also have to adjust the proportions slightly for a petite stature.

The biggest downside is that this will be almost entirely a labor of love as far as pattern writing goes. Although I'm not exactly stealing a pattern, I am doing my best to reconstruct one from a finished object designed and sold by someone else, and so I think any attempt on my part to sell my copycat pattern would probably amount to plagiarism. Even if it's not exactly illegal, it would be artistically dishonest. But, if I take clear notes, I can at least reproduce the sweater more than once should anyone else want one, which is a much more acceptable route, legally and morally.

Close study of the photos revealed that the texture of the entire sweater, excepting the sleeves, was a 1x2 ribbing made of slip stitch columns and garter stitch. Easy peasy. The sleeves themselves are just stockinette, even easier. The front trim and gore panel in the back are actually fabric sewn onto the knitting. I will have to take a sweater piece with me to the craft store and hunt down the perfect coordinating lace.

Yarn!!!
For yarn, I went with KnitPicks Comfy Worsted in Flamingo. Comfy, as I mentioned in my last post, is one of my favorite non-wool yarns for mom projects. The color, a lovely pale neutral pink, is one that I suggested but never thought she would actually choose. But she did! I ordered 10 balls, thinking that just over 1000 yds would be plenty for this project. But now I'm not so sure I won't need more, which is always a pain in the butt because of the difficulty of obtaining skeins from the same dye lot. I will have to make my decision as soon as possible so that I can contact Knit Picks and see if it's possible to get more from that lot. It took most of one skein to do just the back panel, which is the smallest piece. I expect to use nearly four skeins doing the shawl collar, and the "wings" and sleeves are even bigger. Yipes.

Well, first things first. I figured out my gauge and completed the back panel, which has really cool symmetrical shaping that was fun to figure out with lots of staring and experimental charting.

The back panel. Note the super clever shaping. 
Next, I cast on for the shawl collar. This is going to take a while since it's essentially a short scarf. The weather was absolutely gorgeous today, so I made sure to get cozy outside for a while so my complexion and my stitches could soak up some sun.  More pics soon!

The sun does shine in Oregon.

Wednesday, February 26, 2014

In Defense of Acrylic

Knitters don't give stash away easily. If you are offered something, be it wool, angora, or alpaca, take it. 
That knitter knows you'll need it someday. (This, of course, doesn't apply to acrylic. Run from acrylic.) 
~Rachael Herron, How to Knit a Love Song (also appearing in How to Knit a Heart Back Home)

A haughty disdain for man-made fibers is, sadly, not uncommon among the knitterati. I read snippets like this and cast a glance at the Vanna's Choice and Wool-Ease hats adorning my coat-rack, issuing a silent apology to Lion Brand for momentarily thinking any less of their workhorse acrylics and acrylic blends.

Would I love to never knit from anything but 100% natural fibers ever again? Sure! I'm an Oregonian - sustainability is practically a religion out here, as is supporting small, local businesses. I'm well aware that acrylic yarns are probably not very biodegradable. I'm also aware that shopping at stores like JoAnn and Michael's undermines the local yarn stores. I once had a dream of being an LYS owner myself, even took a business class, until I quickly and rather depressingly realized that boutique retail just can't compete, and most, if not all of these stores are struggling desperately to stay open.

And this is because, #1 on my list in defense of acrylic, WOOL IS EXPENSIVE. And that's just basic sheep's wool. Once you get into the gourmet wools - merino, alpaca, cashmere, and non-wool animal fibers like angora and silk - the prices get prohibitive to anyone but the most sporadic knitter with oodles of disposable income. For someone like me, someone raising a family on one income, someone who knits almost every day, the thought of shelling out $25 a skein is just alarming and impossible. 

What about the non-animal natural fibers? Cotton, linen, hemp, bamboo? These can be somewhat less expensive than animal fibers (not always), but at a serious cost to texture, stretch, and drape. Cotton is heavy. Linen and hemp are stiff. Bamboo is lovely but often has to be blended with something else to keep it strong. None of them are ideal choices for sweaters, scarves, winter hats, or baby blankets. They are mostly relegated to washcloths and other housewares, or spring and summer tank-top and tee-shirt type projects.

The major advantage of plant fibers over wool, it seems, is that they can be worn by pretty much anyone without any skin irritation. Which brings me to #2 on my list: WOOL IS ITCHY. Not for everyone, not even the majority of people, I think, but there are plenty of people who simply cannot have wool touching their skin. It ranges from actual wool allergy (which must suck) to a merely mild sensitivity. My mom, while not allergic, has a severe sensitivity. Even the softest superwash merino or alpaca will make her itch like crazy. Her one exception is cashmere, but can we say, hello, thousand dollar sweater? 

Now, not all acrylics are created equal. I understand that when they first flooded the market in the 70's or thereabouts, they were pretty hideous. They were plasticky, even squeaky. If you have ever worked with squeaky yarn, you know what I'm talking about. It's shudder-inducing. Some major acrylic yarn purveyors have never really improved. Red Heart, I'm looking at you. Red Heart Supersaver is pretty much the cheapest and the most horrible non-novelty yarn you can find. I only recommend Supersaver as yarn you don't mind wasting when you are first learning how to knit.

But these days, there are countless beautiful, soft, springy acrylics and acrylic blends in a wide range of gorgeous colors. They are machine washable. True, they don't block - even with aggressive steaming, you may never get your pieces to lie perfectly flat, but there are things you can look for in a pattern that indicate less of a need for blocking. They are affordable, breathable, warm, versatile, and best of all, they can be worn by almost anyone. I know it's possible to be allergic to pretty much anything, but in my experience, a sensitivity to synthetic fibers is way less common than one to wool, so it's a much safer bet for gift-giving. Lion Brand, widely available at any big box craft store, makes most of my favorites, and I carefully ignore their less desirable offerings - the cascades of abominably tacky novelty yarns. Knit Picks is another great supplier, and although their synthetic pickings are limited to Comfy and Brava, their yarns are consistently high quality and low price, in my experience. Also, they wouldn't touch novelty yarn with a ten foot needle.

Synthetic yarn is not evil. Sometimes, it's your best choice when you consider the project type and recipient. A machine washable baby blanket, a warm cardigan for someone with wool allergies. Just don't make them out of Fun Fur. Please. And if you can, when you can, support your local yarn store!

Oh and by the way, even though the above Rachael Herron quote makes me sad, her books are adorable. She writes cute romances with lots of knitting between the steamy sex scenes. I advise you to check out her works, if you're into that kind of thing. ;)

Thursday, February 20, 2014

Silicon Forest Tunic - Now Available!

The Silicon Forest Tunic is now available for sale in my Ravelry Store!

Here's a preview!


I'm so excited! My beta knitters were all incredibly helpful, and their finished sweaters all look amazing. I've made some pretty serious revisions to the wording and chart layouts and I think I've got a really beautiful, polished product on my hands - soon to be in your hands! Knitter hands! So many hands!

I think I'll take a breather before I break my exclamation point key.

PS - I plan to look into how to sell directly from my blog as well, for those not on Ravelry (silly people), but for now I'm out of nap time and have to go rescue my little model from her crib.

Saturday, February 8, 2014

Because We Really Needed More Snow

It's Day 2 of Portland Snowpocalypse Fashion Weekend!

Today Chloe and I are sporting our lace berets and I've got on my favorite cowl. OK, it's my only cowl. Honestly, I think cowls are weird.


Chloe's beret is knit from Caron Naturally Caron Spa in Naturally (what a mouthful!) from the pattern Sirle by Suvi Simola. The yarn has been discontinued, which is truly a shame because it's one of my very favorite wool-free DK weight yarns, even if it's a bit splitty. Good thing I still have several partial skeins of it in my stash! This beret is a discarded first attempt at the Christmas hat received by one of my sisters-in-law, and even though the brim is a bit wonky, I love it as much as she loves hers!

My beret is knit from Knit Picks Gloss Fingering in Sea Spray from the pattern #24 Lace Beret by Kate Gagnon Osborn. 

My cowl is knit from Knit Picks Chroma Worsted in Mesa and Knit Picks Bare Comfy Worsted. The Bare (undyed) doesn't seem to be available right now, so here's the dyed version of Comfy Worsted. The pattern is the Herringbone Mosaic Cowl by Elizabeth Elliott, published in the Interweave Knits Holiday Gifts 2012 issue.


All this snow will probably be washed away in the several days of rain that is scheduled to arrive tomorrow with warmer temperatures, so I'm happy and grateful to have gotten the chance to take my little girl out in the snow and show off so many of our favorite knits! :D

Friday, February 7, 2014

Snow!?!?

Bust out the knitwear, everyone! It's SNOWING!  In PORTLAND! Imagine that!  Let me take this opportunity to put on a little fashion show for you!


My ushanka is knit from Knit Picks City Tweed HW in Snowshoe (how apropos!) - pattern #7 Cabled Hat by Deborah Newton, appearing in Vogue Knitting Winter 2010/11.

My entrelac scarf is knit from Knit Picks Chroma Worsted in Mesa. Chroma makes the most gorgeous entrelac projects. No specific pattern. I have developed my own method of doing entrelac that uses slip stitch edges and invisible lifted increases for the increase triangles. Perhaps a tutorial for that is in order, too?

Chloe's bonnet is knit from Lion Brand Vanna's Choice in Espresso and Burgundy, and Lion Brand Wool-Ease in Blush Heather. As you know, I test knit this pattern so it's not available yet, but I will link as soon as it is!

Tuesday, February 4, 2014

Smocking Tutorial

Smocking! It's one of the design features of my upcoming pattern for the chunky billed cap I designed for Tanya, and as it's not a super common technique, and my husband took such lovely close ups of my knitting hands, I'd like to share a tutorial here, just for you.


Smocking is a method of gathering two or more columns of stitches into a slightly pinched bunch, and looks like this --> 

It can be achieved a couple different basic ways. One is to create an elongated extra stitch to lay across the front of your smocked stitches. This stitch is then worked together with the first stitch in the smocked group to keep your stitch count the same. It also results in a slightly slanted smock, since the elongated stitch gets pulled upwards to be put on the needle.

Another method, the one I'll be detailing here and the one used in the Tanya cap at right, uses the working yarn to wrap around your smocked stitches before continuing on with the rest of your row. Because this doesn't create an extra stitch, there's no need to work any decreases before you continue, and the smock is perfectly straight.

In this example, I'm smocking 3 stitches together. First I'll show this using an extra cable needle to separate out my stitches to be smocked, and then I'll show you how to move the stitches back and forth to achieve the same end result if you don't have a cable needle, or just don't feel like digging one out.


Smocking With a Cable Needle

 1. Knit the stitches to be smocked. In this case, there are three. Transfer those stitches from the right needle to a cable needle. Your working yarn should be to the left of your stitches, since they have already been worked for this row.
 2. Bring your yarn to the front and wrap it left-to-right across the front of your stitches. Continue wrapping around the back until you've made a full circle.
3. Wrap the yarn once more so that you have two loops of yarn wrapped around your stitches. Transfer the stitches on the cable needle back onto the right needle and continue on with the rest of your row!

Don't pull too hard on the yarn - you only want the smocked stitches to look a little pinched, not strangled.


Smocking Without a Cable Needle - or, the Back and Forth method

 1. Knit the stitches to be smocked just like in the above method. Then, keeping the working yarn in front, transfer them back to the left needle.
2. Wrap the yarn left-to-right across the front of your stitches and move the yarn to the back.

3. Transfer the stitches back to the right hand needle and bring the yarn to the front. (Sorry, no picture of this, will try to get one.)
 4. Repeat steps 2 for your second loop.
5. And finally, move the stitches back to your right needle again so that you can continue on with the rest of your row.

Again, try to avoid strangling your stitches!

Thursday, January 30, 2014

Lacy...

I'm blocking a gauge swatch for a new project! Can anyone guess what it's going to be?


I won't really be able to get officially underway until I make another Tanya Cap (maybe to be renamed?) and get the pattern for that written, but once I math it out, I'll be ready to cast on hundreds of stitches!

Wednesday, January 29, 2014

My Sunshine

Every year since I moved to Oregon, I've gotten to enjoy a unique meteorological phenomenon that I call, rather unoriginally, "February summer." For a week or two, or even three, every February, the sun comes out and temperatures soar well into the high 50's or 60's, until inevitably, the clouds, rain, and arctic chill come creeping back for another few months.  This year, it came a bit early, starting just after the new year, and as of yesterday, we've officially bid the teaser summer of 2014 farewell.

I got to take the photos of Chloe in her new blue sweater while the sunshine still lasted, and I was afraid that once the rain set in, it would be too late for a photo shoot of her in the fairisle bonnet I was test knitting, but it turns out my baby girl is a true Oregonian after all! We went out for a walk in the misty drizzle this morning, and I got some really great shots in the overcast light.


The pattern for this cap is by Nuria Pastor and will be available soon at http://www.bezencilla.com/en.

I also took the opportunity to snap some decent non-phone pics of the chunky billed cap I designed for Tanya. I'm nearly done writing the pattern out, but I'm going to have to knit another one before I can submit this pattern for testing, because I am going to need some good progress pics to illustrate some of the trickier construction points. I improvised some fairly non-standard  methods to get the look I wanted, and I think without photos, the pattern will make no sense to anyone who buys it. :P